Tuesday, July 26, 2011

Thrift Store Fabulous

I love, love, LOVE thrift stores!  There are several thrift stores in my area, but lately I have found Goodwill to have the best prices. I love that our Goodwill is clean, organized, and the employees are very friendly and helpful. I also like that every week a certain colored tag is 50% off. This week's tag is red. I stopped by looking for jeans for the kids for school. I didn't find any in their sizes that would work, but I did find some fabulous things, anyway!
 

Today's treasures included:
  • A vintage quart milk bottle - $.99
  • A glass cake stand  - $2.49 (it was a red tag item)
These two items are going to be a birthday gift.
  • A small vintage Pyrex container (it is going to hold sponges on my kitchen sink) - $.99
  • E bay for Dummies (Dear Hubby wants to start selling some of our unwanted items on E bay, and doesn't have a clue how to start) - $1.49 (it was a red tag item)
  • Three pairs of shorts for the boys - 2 pairs were $3.99 each, one was $1.49 (red tag)
  • A brand new Target Home brand fabric shower curtain (I have been looking for a new shower curtain for the upstairs bathroom. The one that we are currently using is 14 years old and pretty worn out) - $7.99
 Today grand total spent was $25.13. Not bad considering the shower curtain alone would have cost at least that bought new at the store. I do love a good treasure hunt! Have you found any fabulous items at the thrift store, lately?

Sunday, July 24, 2011

This Week's Menu 7/24

(this week's Bountiful Basket)

Summer just seems to be flying by! I can't believe that it is the last week of July. It seems like we were just celebrating the Fourth! Sigh, now it time to start thinking about back to school shopping. My children are really not pleased every time I mention  S-C-H-O-O-L. I get a collective glare of pig eyes every time that CERTAIN word comes out of my mouth. You would think it was a four letter word! Anyway, taking inventory of the boy's closet is number one on the to do list this week. This week I am also attempting to liven up the menu a little bit. I have been perusing Taste of Home and Cook's Illustrated magazine.  I found several good recipes to try. I mean, I guess it's pointless to subscribe to cooking magazines if you don't actually cook any of the recipes out of them! This week we will be eating the following culinary masterpieces (snicker! snicker!):

Sunday
BBQ Chicken
Green Beans, Potatoes, and Bacon
Banana Blueberry Muffins
Water Melon
Mango Crisp

Monday
Migas ( Taste of Home recipe)
Flour Tortillas
Cantaloupe and Watermelon
Lettuce and Tomatoes
Leftover Mango Crisp

Tuesday
Three Cheese Baked Ziti (Taste of Home recipe)
Easy Breadsticks
Strawberries and Whipped Cream

Wednesday
Ham and Cheese Paninis
Slices Peaches
Mashed Sweet Potatoes

Thursday
Chicken Fried Steak with Country Gravy (Cook's Illustrated)
Mashed Potatoes
Steamed Broccoli and Cauliflower
 
Friday
Leftover Night

Saturday
Grilled Hot Dogs
Baked Beans
Chips
Fruit of Some Kind

What beat the heat recipes have you been cooking at your house?

Saturday, July 23, 2011

History Always Repeats Itself

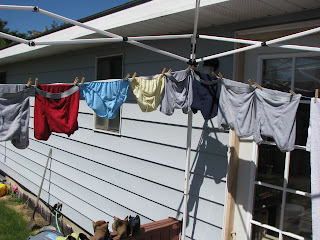
As I was hanging this particularly LARGE  load of "delicates" outside to dry this afternoon, I was struck by the thought....


That "History is destined to always repeat itself!".


P.S. Can you tell that I live in a predominately male household?

Thursday, July 21, 2011

Making Scrub Sponges Last Longer

I really like to use Scotch Bright scrub sponges to wash dishes (and scrub dirty counters). 


I can usually buy them cheaply with coupons (especially at Costco).


 Two make the sponge last twice as long, I cut it in half with a sharp pair of scissors.


One half of the sponge is just the right size (especially for kid's size hands) to wash dirty dishes. I always place my sponges on the top rack of the dishwasher when I wash a load of dishes in it to disinfect them.


You need to keep sponges dry between uses, so that they don't become a breeding ground for bacteria. An old plastic berry basket in the drying rack works great for hold drying sponges (and the lids to water bottles, so that they don't don't fall down the garbage disposal).


This little trick my not save me a ton of money, but every little bit helps!

Wednesday, July 20, 2011

Baking Cheesecake


I like to bake cheese cake. Cheese cake is kind of my signature dessert. I bake it for gifts, fundraisers, birthdays, and holidays (and once in awhile, just for funzies). I will let you in on a little secret..........making (and baking a cheesecake) is very easy. When I decided to conquer # whatever on my bucket list, and try my hand at making a real, live baked in the oven level 5 (in my head) dessert; I did a little research. Now I will let you in on another secret. To get a perfect cheesecake, you need to water bath it. Water bathing will give you a light, fluffy cheesecake without cracks in the top. To water bath a dessert in the oven, simply means that:
  • You place a rack in the bottom of a pan larger than your spring form pan. I use four canning jar lids placed in a "circle".
  • You place the spring form pan (or dessert mold) on the rack in the pan.
  • Fill the larger pan with a couple inches of warm water.
  • To make it easier I place the large pan on the oven rack before I fill it with water (just don't pour water on the cheesecake batter).
  • Always remember to step back when you open the oven door to retrieve your cheesecake. The steam build up will melt you mascara if you are standing to close (I learned the hard way!)
Water bathing will also produce a soggy, wet crust (because some water will seep into the bottom of the spring form pan). To remedy this little problem, most recipes will tell you to cover the bottom of the spring form pan with  a double layer of aluminum foil. That has been my usually method, but it's kind of wasteful to use that much foil, and I have still had the soggy crust issue. However, I was reading in a Cook's Illustrated magazine (love, love, LOVE Cook's Illustrated), that if you use an oven roasting bag instead of aluminum foil, it eliminates the soggy crust problem. I tried it a couple of days ago, and it worked great. The best part is, that if you hang the oven bag up to dry when your done, you can reuse it for the same purpose; later.

Open up the oven bag (I used the large size that will hold up to an 8 pound roast), and roll down the sides of the bag. Place the spring form pan in the center of the bag. Roll the sides up a couple of inches above the rim of the pan.


Place the covered spring form pan on the rack in the larger pan. Fill the larger pan up with a couple inches of warm water. Use warm water! Cold water will cause a temperature fluctuation that affects the baking time, and it could shatter the glass pan.


It is amazing how finding a handy, dandy tip in a magazine makes life a little easier!  Now that I have inspired you all to add cheesecake baking to your bucket list, you can find my tried and true recipe HERE. I guarantee that you will be the hit of the party if you "whip" one up for your next get together. Not to mention you will achieve mythical status among friends and family (No one has to know how easy it is)!  Happy baking!

Tuesday, July 19, 2011

A Really Great Birthday Gift And Line Drying Laundry

I really have a fabulous Husband! I mentioned in an earlier post that He had been hinting about my really great birthday gift. He was right, it IS really great, and just what I wanted! I was at Costco about six weeks ago and saw this fabulous stainless steel drying rack. I didn't buy it at the time thinking that maybe it would go on sale or that there would be a coupon for it in the next month's coupon book (always the cheap skate). A couple of week's later when I went back to Costco, with every intention of buying the drying rack, they were sold out!! Stink! They have been sold out every week, since! Well, on my birthday my Dear Hubby, giddily surprised me with.............. a very much sought after (by me) drying rack ( He snuck to Costco, the day after he heard me mention how much I wanted the drying rack, bought it, and had been hiding it ever since!). Of course, this week Costco has them in stock, and they are on sale, but who cares!


My present couldn't have come at a better time, because:

A) I try to line dry most of our clothes from late spring until late fall (or when snow flies, which ever comes first) to save money on the power bill. By not using the dryer, I can justify using the air conditioning ( I am not a happy camper when I am hot and sweaty).

B) My makeshift clothes line that I have been using for several years broke, and I do not have a replacement awning, yet. I don't have a place in my back yard to put a permanent clothes line, so every year I have to make do.

I have strung a clothesline around the Quick Shade awning that is sitting on our deck (to shade the French doors from the blazing afternoon and evening sun). It has worked well so far, but it is not big enough to hold more than one load of laundry. Laundry day at our house consists of way more than one load of laundry! Now that I have my new, swanky drying rack, I can hang all the shirts on plastic hangers and place them on the rack to dry (which is handy for putting them away when they are dry). It is also has plenty of rungs to hang towels, undies, and socks on.


Not to mention, it makes a great place to set the clean laundry as I take it off the line and fold it.


My clothes pin bag that I made out of an old kid's T shirt also disappeared this year, too. Luckily, I was able to find a new clothespin bag and clothespins at our local dollar store (every Tuesday they have $.88 Tuesday, so one bag and three packages of clothes pins cost $3.52).


I also read on The Frugal Girl's blog that if you toss shirts, undies, towels, and socks in the dryer on the air dry setting (which costs hardly anything to do, because heating the dryer is what costs money)  for a few minutes before you hang them to line dry, they will be much softer and wrinkle free. I gave it a try and it worked great! I just toss the clothes in the dryer, on the no heat setting, while I put another batch in the washing machine. Then I remove and hang the wet shirts on hangers, and put the rest of the clothes in a basket to carry outside to hang up.

P.S. I love line drying clothes. It makes me slow down from my daily craziness, and gives me time to hold still and think.  Hanging wet laundry on the line and watching it blow in the breeze is kind of like going to my "happy place".

Monday, July 18, 2011

Strawberry Freezer Jam

Well, can I just tell you how proud I am of my little ol' strawberry patch!


 I planted it two years ago around our back yard deck with starts from a friend's garden. Last year, it produced a small bowl full of berries. This year, it has far exceeded my expectations! Last week, it produced a small mixing bowl full of berries. Enough, to mix with rhubarb and make  cobbler. This week, it has provided me with a large mixing bowl full of very ripe strawberries.


Plenty of strawberries to make two batches of Strawberry Freezer Jam. Eight pint jars worth! (Notice that I used empty peanut butter jars to store the jam. The peanut butter jars stack beautifully in the freezer.)


My hard working little patch has also been frantically sending out lots and lots of  runners (baby strawberry plants).


Hopefully, next year those little baby plants will produce even more strawberries! YUM!

Sunday, July 17, 2011

This Week's Menu 7/17

 (this week's Bountiful Basket)

This week is shaping up to be a clean out the fridge kind of a week. I have discovered numerous containers that contain all sorts of odds and ends.  I am really trying not to toss food in the trash, which seems to have happened for the last few weeks. Some of our  meals have gotten side tracked by last minute plans the last couple of weeks (which seems to happen quite often in the summer), and I think that is what is leading to so much food waste.  I am hoping for a waste free week! This week's menu will include:

Sunday
Leftovers

Monday 
Chicken Potpie
Pudding Salad
Watermelon
Banana Cake

Tuesday
Potato Sausage (Zuppa Toscana) Soup
Parkerhouse Rolls
Green Salad

Wednesday
Spaghetti
Green Salad 
Melon

Thursday
Sub Sandwiches
Home Made Buns
Chips 
Cucumber Slices

Friday
Vegetable Stir Fry
Rice 
Fruit Salad

Saturday
Leftovers

Another boring week, but I'm hoping for a bare refrigerator by Saturday night! What is your favorite way to use up leftover odds and ends?

Friday, July 15, 2011

Every Bargain Hunters Dream

Dear Daughter's BFF gave us the heads up this afternoon that Down East Outfitters was having a spectacular side walk sale! I love Down East's style of clothing, but their regularly priced clothing is not really a great deal, and usually out of my price range ( I usually end up picking them at our local thrift stores). However, their side walk sales are usually full of rock bottom prices, and to die for! Of course, we loaded up in the old Suburban and headed right over (with BFF in tow) to check out the sale. I am really, really, REALLY glad that we did. We got some amazing deals! When we arrived there were six large tables, under an awning, covered with cardboard boxes (Did I mention that my palms started getting sweaty, with excitement, from the thrill of the "hunt"?). Each box was marked between $2.00 - $10.00, and each was filled to the brim with skirts, t shirts, blouses,sweaters, dresses, jackets, pants and shorts. Dear Daughter, BFF, and I didn't waste any time. We started digging through boxes like "rats through a sewer".  There were  A LOT  of x-small items (which really wouldn't work for us), but there were plenty of items in our sizes! 

We found seven sweaters. Each was marked for $7.00. Some of them retailed for $30.00 or more.


Two jackets (both for Dear Daughter, who has a jacket fetish). One is corduroy ($10.00) and the other leopard print (Obviously; it was $7.00).


Three dressier shirts ($5.00 a piece) that will be fun paired with skirts or jeans.


Four long sleeved T shirts (the white one was $5.00 the other three were $2.50 each). which are nice for layering in the winter.


Four half sleeve T shirt and one short sleeve lace edged layering T shirt for $2.50 each. I like to layer the half sleeve  and long sleeve T shirts under my scrubs at work in the fall and winter. They add some warmth without bulk.


Two camisoles ( $5.00 each) which are a must have to wear under shirts and sweaters in the winter. Bonus: white camisoles and T shirts never seem to go on clearance, so finding them for $5.00 vs. $9.99 or $12.99 if fabulous in my book.


A VERY cute wrap style dress for me ($10.00). It will be great to wear in early fall with flip flops and this winter with my black boots (and a black camisole underneath).


 My favorite bargain was the black cardigan sweater that was $7.00.


One of the shoulder seams had unraveled leaving and open seam, but  five minutes with my sewing machine fixed that.


What really got me excited was when I looked at the laundry care tag after repairing the sweater, and realized it is Merino wool.  A wool sweater for $7.00 is a great deal. Do you know what the cherry one top of this whole sweet deal is?  The price tag revealed that the silly sweater originally retailed for $88.00! Now, I'm sure I will feel uber chic wearing my "expensive" sweater!


Dear Daughter now has two jackets, two sweaters, one dressy shirt, two T shirts, and a camisole for school. I now have five sweaters, two dressy shirts, three long sleeve and four shorted sleeve T shirts, one camisole, and a dress. I usually don't buy that many clothes for myself, but my wardrobe is sadly lacking right now. Most of my shirts and sweaters are worn thin or full of holes. I used my birthday money to buy my clothes, and some of the school clothes fund to pay for Dear Daughter's. The best part is that we were able to purchase 24 items of new clothing for $130.50. Even better is that we saved $512.42!  The sales clerks and our fellow bargain shoppers gave us a round of applause when the clerk announced our savings! I felt like a shopping Queen!


Right now is a great time to pick up school clothes or next year's summer clothes and shoes on end of the season clearance sales. A lot of stores are also marking an additional 20 - 50% off the lowest marked price on the clearance items, as well. Next on my back to school bucket list is finding school shoes for Child #3 and 4 on the clearance racks.  Both of their feet seem to be growing at an alarming rate, and the shoes they are wearing now probably won't fit by September.

Make Your Own Mixes

I taught a class for my Church's ladies organization last week on stretching your grocery budget. I based the class on this POST. I also included some links for make your own mixes, convenience foods, and spice blends in the handout I passed out. Making your own mixes and spice blends are a great way to save a little money; plus when you make your own you always know what the ingredient list is! I thought I'd share the links with all of my favorite Bloggy Friends, too. If you find something in the list below that interests you  just click on the title to go to the recipe.

Spice Blends:
Dry Onion Soup Mix
Pumpkin Pie Spice
Taco Seasoning
Ranch Dressing Mix 
Chili Seasoning Mix

Convenience Foods:
Home Made Pancake Syrup
 Bagel Bite Pizzas
Crockpot Refried Beans
Frozen Fudge Pops
Frozen Smoothie Pops
Sweet and Condensed Milk
Granola Bars

Mixes:
Bisquick
Pancake Mix
Oatmeal Pancake Mix
Corn Muffin Mix
Muffin Mix
Hot Roll Mix
Hot Cocoa Mix
Yellow Cake Mix
Chocolate Cake Mix

Hope some of these recipes are helpful!!!!

Thursday, July 14, 2011

Make Do Bathroom Accessories

I really like to decorate. I love to take odds and ends that I find at thrift and consignment stores, gifts, and hand me downs, and turn them  into something attractive (at least to me). In my younger days  I used to spend countless hours crafting with friends to create accessories to make a "home". I don't have time to do that anymore, but I still like to rearrange and add new accessories every now and then to shake things up a little.

The bathroom is one area at our house that gets taken for granted. It tends to be pretty utilitarian in both bathrooms. After all, the men in my household don't care much for fluffy decorations in the bathroom. It's more about the reading material that is available. To pretty things up (and give my bathroom a girly touch), I grabbed some things from around the house, and used them to hold some essentials on the bathroom counter.

I used a ceramic mug from an old dinnerware set to hold toothpaste and all the toothbrushes that wander into my bathroom (why is Mom and Dad's bathroom cooler than your own?). I just turned the broken handle side to the wall.  An antique half pint canning jar that I bought for a dollar at a consignment store (it didn't have a lid) holds 5 oz. paper cups.  Small stoneware crocks (that Dear Hubby bought me) stores cotton balls and q tips.


A larger stoneware crock holds combs, brushes, body spray and mouthwash. Of course, the foaming hand soap pump has been refilled with water and dish soap to save money.


The boy's bathroom isn't about the pretty. It's about the essentials. Besides boy's don't care if things match or not.  I did need something to hold paper cups (they tend to slop water everywhere, and I hate wet, soggy cups). An empty yogurt cup just fit the bill. If you did want to make your cup holder fancy, you could cover it with some scrapbook paper and contact paper (to make it waterproof).


Cheap, quick, easy, and pretty! The four best words when you are decorating. What are some of your favorite ways to decorate on the cheap?

Wednesday, July 13, 2011

Sheet Mending Day

I know I have posted before about spending a little more money on "investment purchases". The theory being that certain items will last longer, and you will get more bang for your buck if you buy a better quality product. Sheets are one thing I will spend a little more money on. Usually, I can get four or five years worth of wear out of a set of 400 thread count sheets. I have had great luck buying my sheets at Ross Dress For Less (it is comparable to T.J. Maxx). I bought my last set of sheets for my King size bed about a year ago at Ross ( I think I spent $40.00 for a 400 thread count king sheet set and two extra sets of pillowcases).

Well, it appears there may be a hole in my theory! Two medium size holes to be exact! When I hung my sheet up on the clothes line, last week, to take advantage to the hot summer day I discovered this lovely hole in the fitted sheet!


Upon further inspection I discovered the second worn spot directly across from the first hole. Boo Hiss!
I wish I could blame the holes on Dear Hubby toenails, but it appears (due to placement of the holes) my toenails may also be to blame!


A new fitted sheet is not in the budget right now, so I had to figure out a way to mend the holes and prolong the life of the sheet until I can find an appropriate replacement (either at the thrift store or on a super fabulous clearance sale). Luckily, I had saved the pillow case for the last set of king size sheets. I cut  the end off the pillowcase (don't worry I hemmed the pillowcase, and it is now on Child #3's standard size pillow) to use for my patches.


I measured the areas to be patched. Then I cut two patches two inches wider and two inches longer than the worn areas.

I pinned the patches on the wrong side of the sheet (the side that will touch the mattress) over the worn areas.


Next, I sewed a zig zag stitch around the edges of the patches to hold them in place. I also did this so that the patches will lay flat (we do have to sleep on them).


I cut the patches with pinking shears, so that the patches won't fray.


After the patches were securely in place, flip the sheet over so that the right side is facing up (the side of the sheet that you lay on). I zig zag stitched back and forth over the worn spots (I zig zagged over a spot and then used the reverse button on my machine to go backwards. Make sure to turn the fabric slightly after each row of stitching, so you sew over all the worn area.).


This reminds me of darning a sock. Essentially, when you darn a sock you are filling in a hole or worn spot by weaving the darning thread around and over the worn out area. That is what I was doing, filling in the worn area (and hole) in the sheet with thread.
 

It may not be pretty to look at, but the mended area lays flat and it was quite comfortable to sleep on. 


I am also happy to report that my mending job held up well in the washing machine this week.  Hopefully, I will able to get a lot more wear out of the sheet before it's time to retire it (or recycle it).

LinkWithin

Related Posts with Thumbnails